Friday, May 30, 2025

Bradel Following Denninger

A few years ago, the Stichting Handboekbinden posted the availability in sheets of Johann Denninger's De Bradelbinding (The Bradel Binding), also here. The New Bookbinder (1996) had published what I consider an abridged version with some history of the structure and something about this Bradel ... Like the article, this book started off with a lot of "according to" history, before going into the step-by-step instructions for what ends up as a hybrid historical/old school Pappband/Edelpappband, the latter so called because of the corner and head/tail reinforcements in parchment or leather, something that was first described in the literature around 1905. I describe the history of the Pappband structure, including a review of the literature and step-by-step instructions for the Ur-form in a 3-post series starting here.

But, back to Denninger ... I rarely follow instructions from a manual when binding it, but decided to in this case. The text is in Dutch, but I could get the gist of most from the illustration and my German/English Denglish. For those parts I couldn't figure out, I took screen grabs from the PDF available at the link above, then using Google Lens to translate the image. Then copy and paste into a Word ... document.

Making the endsheet section: this is a fairly standard historical
endsheet consisting of a double-folio text-like paper to which a
"decorative" folio is adhered resulting in a "made" endsheet(the schutblad). A 
single waste-sheet is hooked around this. You'll 
see why in later steps. 

The signatures were then rough cut. The top edge will get ploughed later

A template ensures that all the sewing holes line up ...

I sewed on three untwisted and frayed out cords, so like tapes, but ...

With the sewing done, the endsheet section was narrowly tipped-on
the adjacent signature, then the spine was glued up nice and square.

After rounding and backing to 45° at the shoulder with my "kashtoir",
I lined the spine with muslin between the sewing stations.

Then, I used my fray shield to clean up and untwist ... the strands
of the cords so that they were nice and clean ...

Next, I applied paste along the spine edge of the waste-sheet
and to the cord, neatly fanning them out and smoothing with a
folder so they weren't lumpy ... (Read image from right to left) 

When dry ..., I ploughed the top edge. Then, I applied a nice rolled
endband, I made mine of leather, and line the spine from end to end. 
 A simple one on, two off hollow was also suggested as an option,
but I went with just a simple paper lining as this is a very small volume.

Denninger then suggested a "gebrochener Rücken", scroll down here, the quintessential
hallmark of this style, or this little piece that was the width of the spine +
2x the slope of the shoulder. I had only seen this in connection with the
"Danish millimeter" binding, but gave it a try.

The edges were pared, then the over-long piece was adhered only
at the shoulder. Then, the boards were attached to the waste-sheet
adjacent to the shoulder. Glue should only go just beyond the fanned-out cords.

In keeping with the style, I made dainty little leather corners/tips.

Then I added the head and tail leather edging, when dry, I reduced
by paring the leather, and then sanded carefully so the transition
would be almost imperceptible.

Important, I also tore off the waste sheet so that it was nicely feathered 
out, and then sanded it so that it was all smooth. That way, the fanned-out
cords don't show through under the pastedown.

The same was done with the corners. They will be "invisible" 
when the cover is viewed board-on, and almost invisible on
the turn-ins.

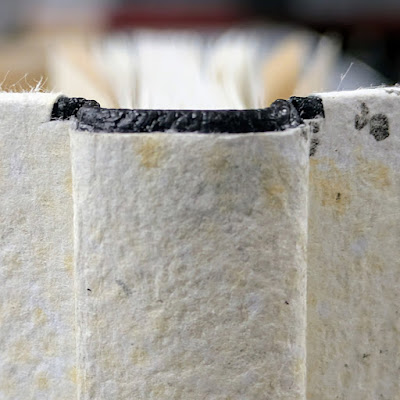
Here, head [and tail] after covering.
After covering and making the turn-ins, I trimmed out the verso
of the board, so it was all neat and tidy.

And the corners from the inside showing the turn-in.

Finally, the overall. I made the oil-marbled paper in 2019. It was my
introduction to marbling in 1984, and 2019 was the first time in over
30 years ... The title is a laser printed recessed label with an edge,
something I learned from Bill Minter when I worked for him a
l.o.n.g. time ago. I describe how to here.

All-in-all, an interesting exercise and fun excuse to get back into binding after an extended absence.

This also ties in well with something I'm working on regarding the evolution of the Pappband/Bradel into the Edelppband, and now this thing called a Sandgren Binding. Nomenclature is important, but gets VERY messy with multiple languages and "creation myths".

Wednesday, May 21, 2025

So That Up Is Up

In a world that is verSPINnert, ahem spinning, it's important to tell up from down, right from wrong, ... So too in bookbinding. That's why I, @FritzOttoBuchbinder, always put an up arrow on the end sheet indicating up, and a "V" for vorne (front). Helps prevent confusion and casing-in upsidedown. Of course, that NEVER happens to me. 🤔🙄😮‍💨


Thursday, May 8, 2025

Dog Chew Cod Parchment

As many will know, fish skin for bookbinding, whether as parchment and tanned has long been an area of interest for me. This interest was sparked by several articles on the subject by Ernst Collin and others largely during Germany's Weimar era. The 2020 Fish Skin Bind-O-Rama was a sort of culmination of my efforts to bring attention to this material, but more so I am very pleased to see binders and book artists still working in the material, in particular Karen Hanmer and Debra Frances.

Some time ago I was given a package of Icelandic cod doggie chew snacks by a friend. Those chews looked gnarly and I wondered if they could be processed into parchment or leather, you know, as an experiment and proof of concept.

Dentley's "Exotics" Icelandic Cod Skins


These things are big at 18 inches, so I needed some help holding
them upright. Note how they are folded/rolled up. 

The third skin in the pack. Keeping this "as is" as a sample and control.
Side "A"

Side "B"

So, as one can see, they're big and folded/rolled up lengthwise. Also rock-hard and in need of serious cleaning and scaling.

First step was to [re]hydrate so I could unfold ... and get them into a quart-sized Mason jar. Plugged the kitchen sink and into the first bath of COLD water with isopropyl and strong dish detergent. Surprisingly, that worked so that after about an hour they could be pulled flat and pushed into the jar. 

Soaking in isopropyl, dish detergent, and COLD water.
This went into the fridge with several changes of water and
dish detergent, accompanied by massaging to help loosen the fibers,
and starting to scrape away flesh, fat, and other stuff. Lots to do there ...

Next was descaling. "Shinies" EVERYWHERE in the kitchen.
"Shinies" was coined by one of the youngest fish skin binders.
In the end I didn't do as good a job as I thought. 🙄

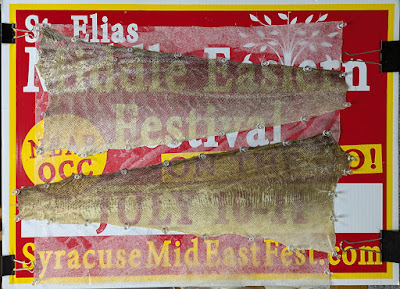
Finally, the skins were stretched out to dry.

Evident on the lower one are parallel lines from something between being caught and dried for packaging. Both skins also have areas where the skin was chewed up. This makes for very gnarly look. I may well use the top one. Would be a shame not to after all that work.

As I was going through all this I googled for these fishy dog chews. Cod and haddock seem most common, with both available in different sizes and shapes, e.g. dainty rolls for that favorite "tea cup" dog. The steps are essentially the same as with fresh caught fish, but this is much easier to store. Maybe these could be good for more basic workshops where skinning a fish, or cleaning a fresh skin is to messy and gross in the eyes of the participants. Simply soak and rehydrate first, then let they have fun scaping and stretching out or tanning.

Though he said he was sick of this fishy business, Fritz Otto snuck off and processed his own cod too ... Probably won't use it, but makes a splendid Dekoobjekt / objet décoratif.